Microsoft Teams
Microsoft Teams is a collaboration tool licensed by Fairfield University for faculty, staff, and students. Microsoft Teams is supported on MacOS, Windows, iOS, and Android.
Signing into Microsoft Teams
Open the Microsoft Teams app OR open any web browser (Safari, Edge, Chrome, Firefox) and navigate to teams.microsoft.com
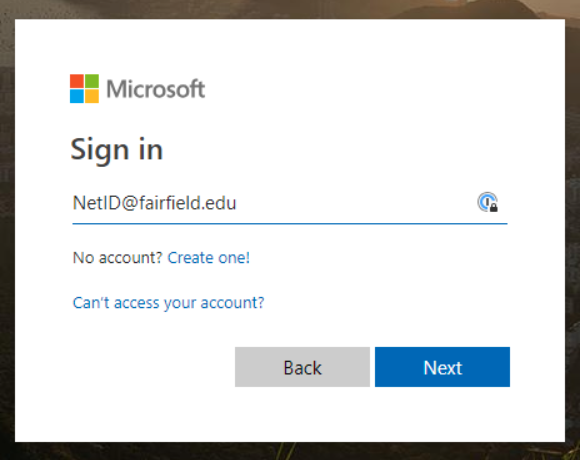
When prompted for your email, please enter your full Fairfield email address
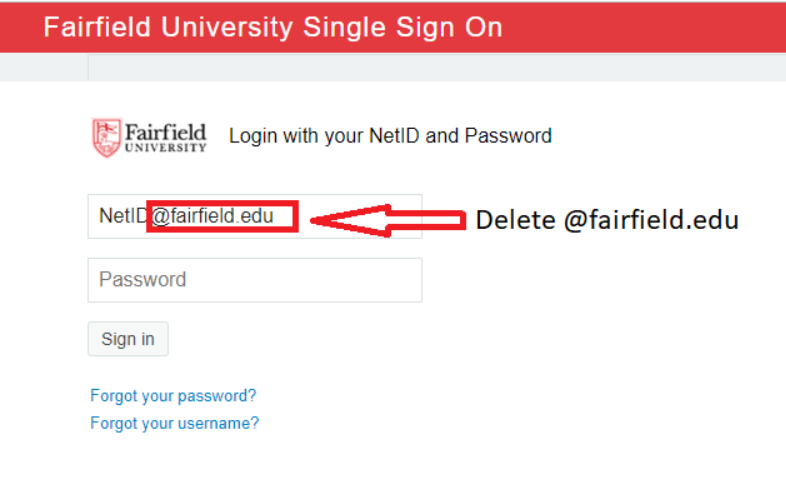
Once redirected to the Fairfield University login page, delete "@fairfield.edu", leaving only your NetID. Then type in your password.
Getting Started with Teams
Create a Team
- On the left side of Teams, click Teams, at the bottom of the teams list, click Join or create a team, and then click Create a new team.
- Select the team types.
Note: If you do not see the option to select a team type, contact the ITS Helpdesk and request the faculty/staff license of Office 365. - Enter a name for the team (For example: Psychology 101, Fall 2021 or Academic Computing).
- On the next screen, you can invite colleagues or students to join the Class Team by entering their NetIDs in the Add Member Searchbox, or hit skip and see Inviting Members below to invite colleagues and students later.
Inviting Members
There are a few options to invite members to a Team after it has been created.
Add Members
- Click the options button to the right of the class team name and select “Manage Team”
- Choose Add Member to search for the user(s) by NetID
Generate Code
- Click the options button to the right of the class team name and select “Manage Team”
- Expand Team Code setting and select Generate
- Share this code with the invited members/students.
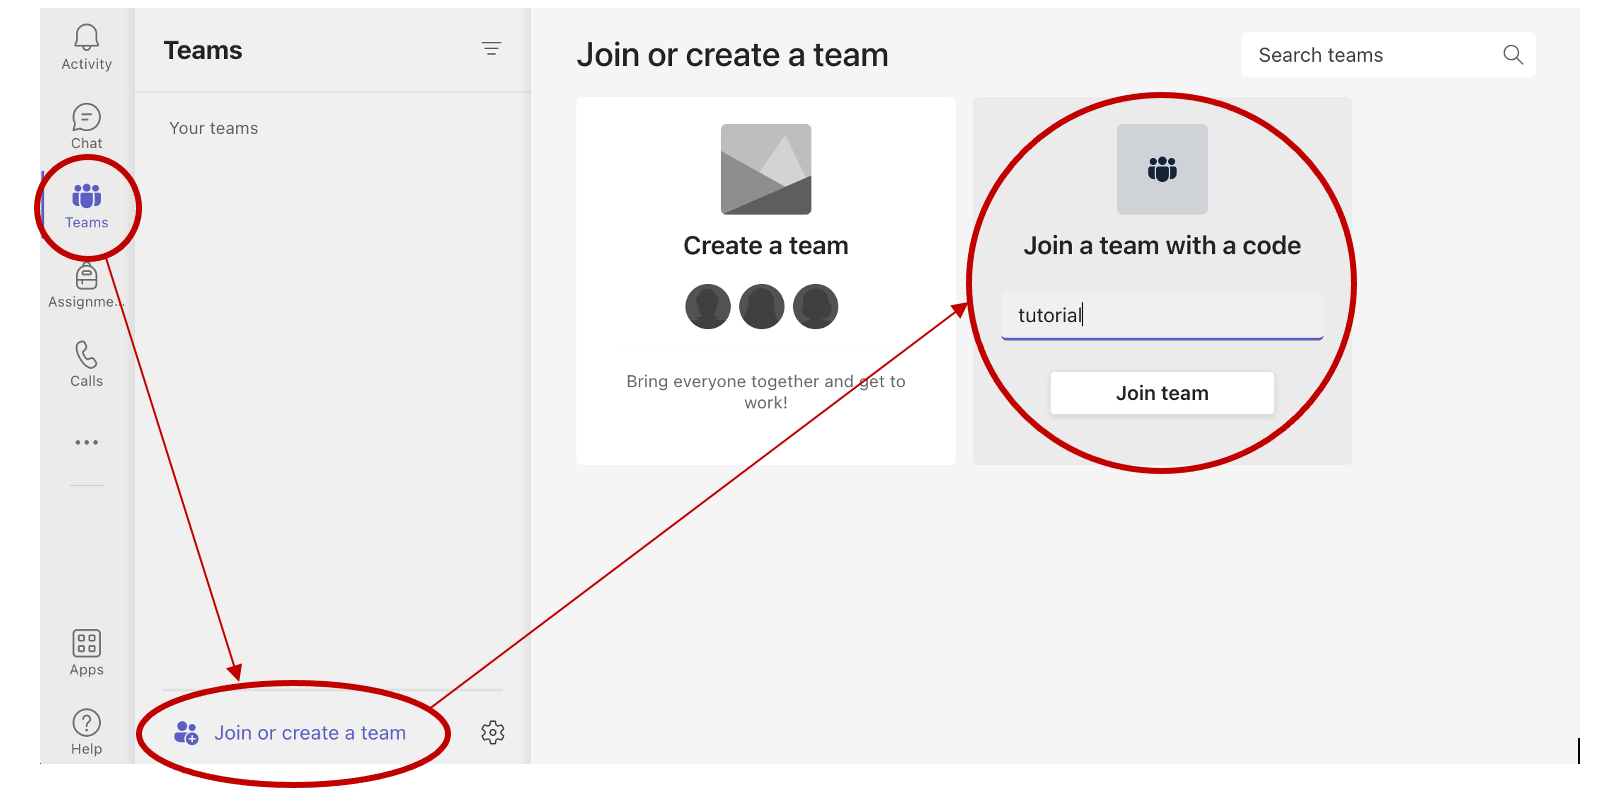
Joining the Team with a Code
- Sign into Teams
- On the main menu, select Teams
- Choose Join or Create a Team
- Select Join
- Enter the Code
Share a Link
Copy the link to the Team
Share the link with members either via email or posting in a shared space such as a Blackboard Course
When students join via link, you will receive a notification that a student has requested to join your team
- Click the options button to the right of the class team name and select “Manage Team”
Select the Pending Requests tab
- Approve students as necessary
Creating Channels for Discussions and Groups
Channels are a great feature for organizing discussions by topic or providing students with a virtual space within the class to collaborate on group work.
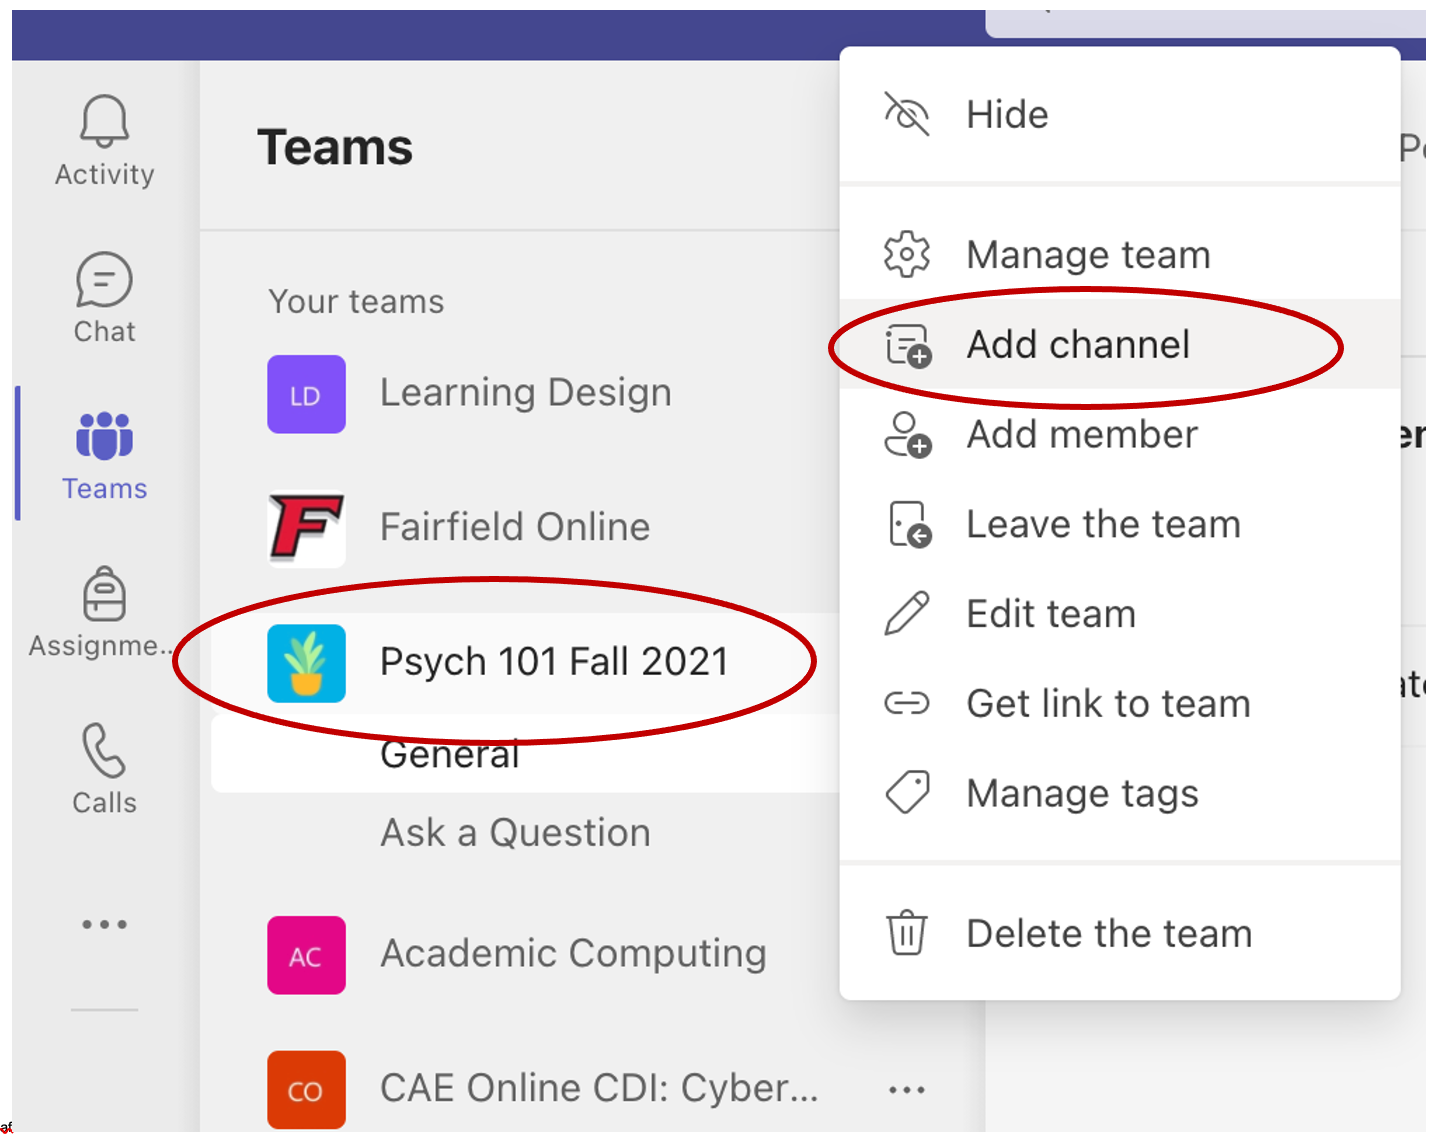
- Find the class team you want to create and select the menu (alternatively you can right click the class name to open the menu).
- Select Add Channel.
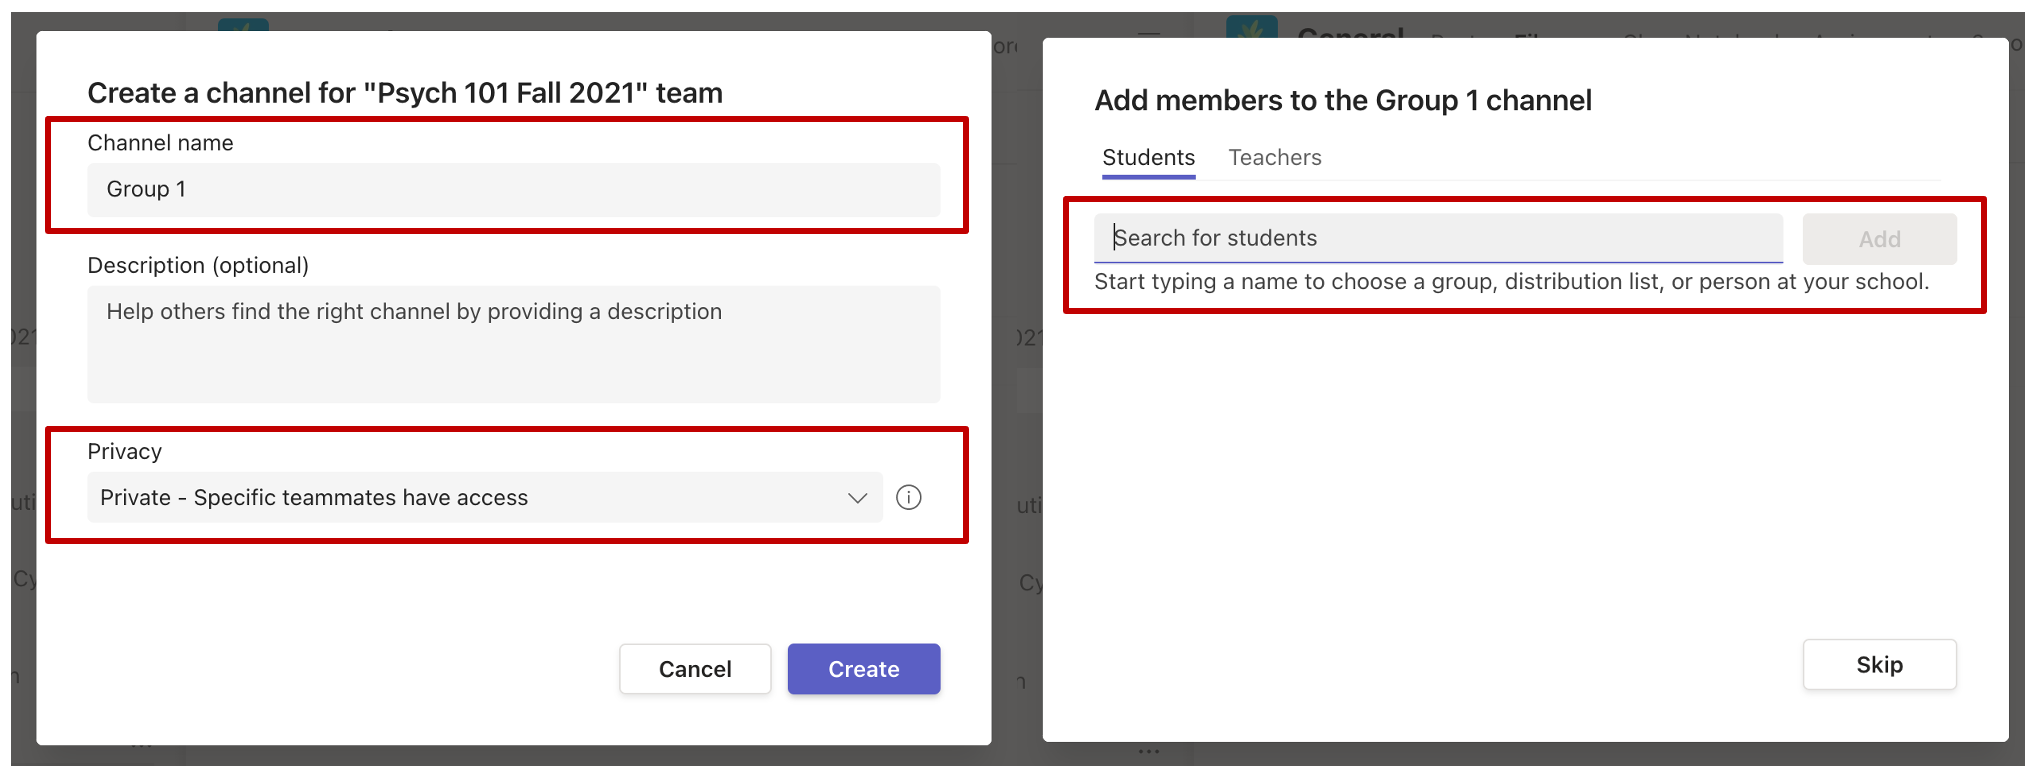
- Provide the channel a name. (FAQ, Discussion 1: Topic “”, or Group Name.
- Review the privacy and select Create.
- The default privacy setting is Standard, which allows anyone in the main class team to have access to the new channel.
- If you are creating the channel for group work, you will want to change this to Private and enter the students associated with that group to provide them access.
Enabling Notifications for Teams and Channels
MS Teams automatically notifies you via email and push notification if you have been tagged in a conversation, but not for general updates. It’s important that you enable push notifications for your Team after joining to stay up to date and engaged in the conversation.
- Select Teams on the left side menu and open the Team if you have not done so already.
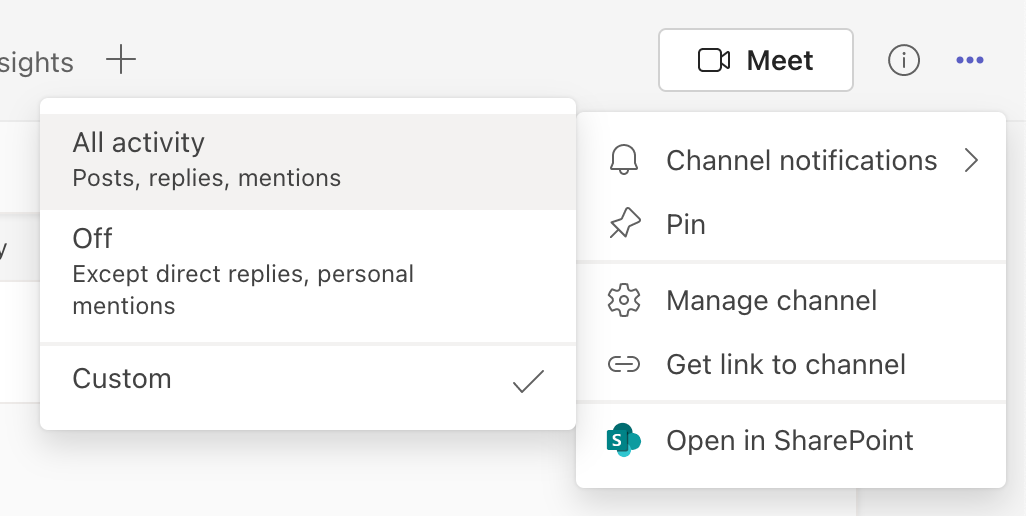
- Select the menu in the top right corner.
- Select Channel notifications, then choose All Activity.
Class or Team conversations
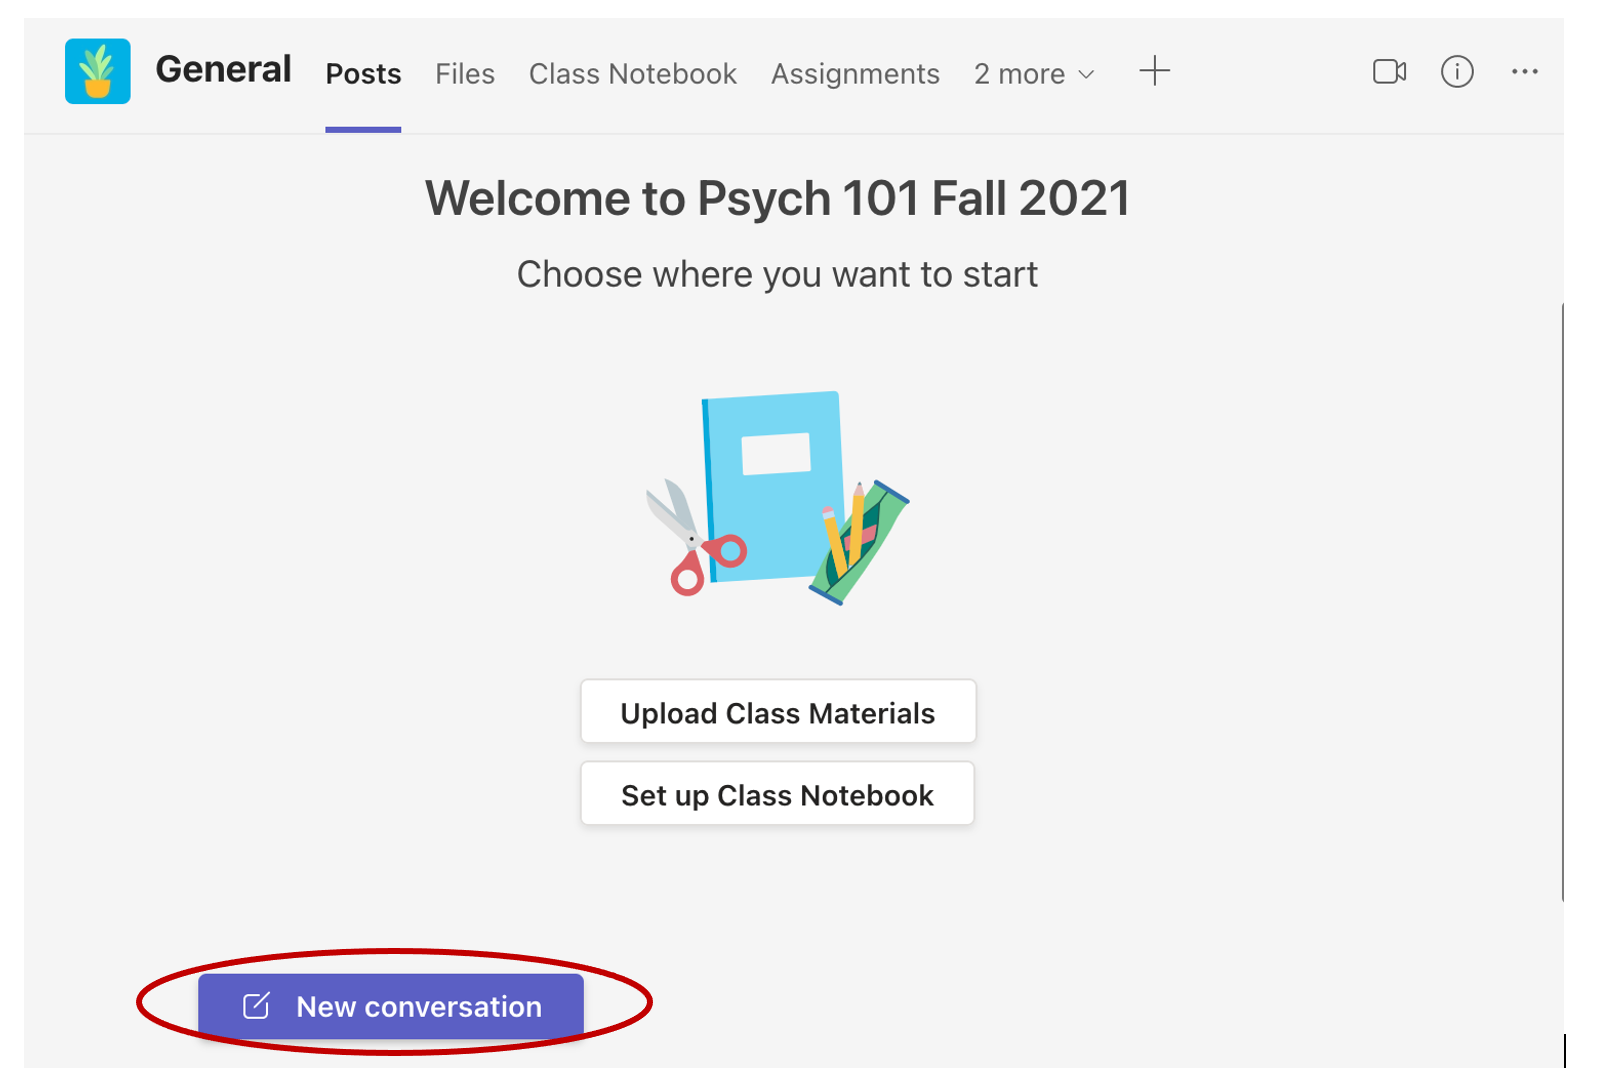
- Go to your Team home page by clicking on the Teams tab on the left-hand menu
- To start a conversation with the entire Team, click on the New Conversation button on the bottom of the chat window.
One-on-One or Small Group Chats
- On the left-hand menu, click on the Chat tab.
- To create a new chat, click on the Compose button on the right-hand side of the chat bar
- Write the name of the person or people you would like to chat with, write your message in the message boxand click send.
Video or Voice Chat
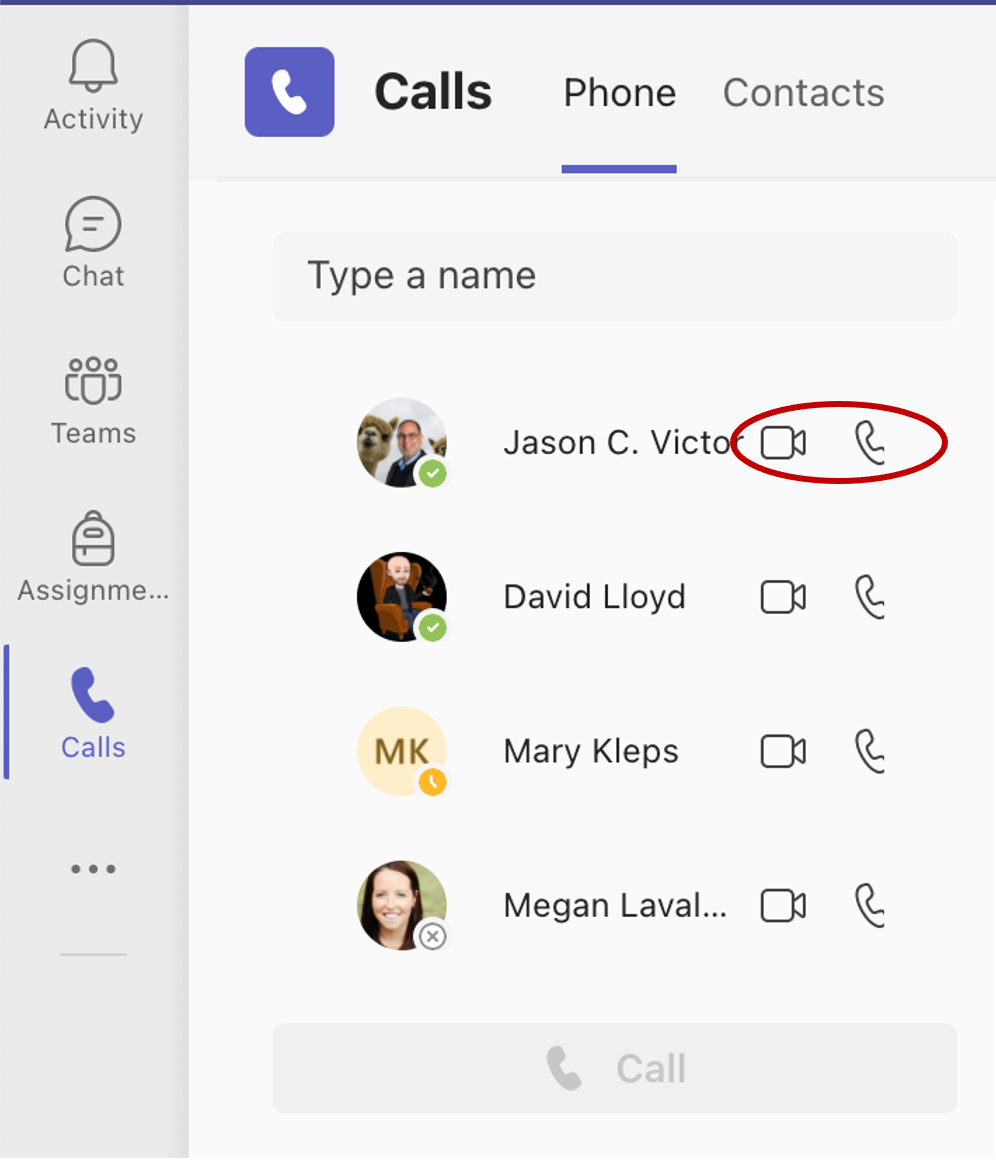
- Select the Calls button from the left-hand menu.
- Type in the name of the person you want to call on Teams and choose voice or video call. Your most recent calls will be listed for quick access.
If you have a previous chat with someone, you can also make a video call following the steps below:
- Go to the chat tab on the left-hand menu
- Find the chat of the person you want to video call. In the far-right corner of the conversation, click on the video button.
Find and Upload Team Files
You can quickly share files for reference or discussion on Microsoft Teams. Any member of the Team can access these files anytime, from any device.
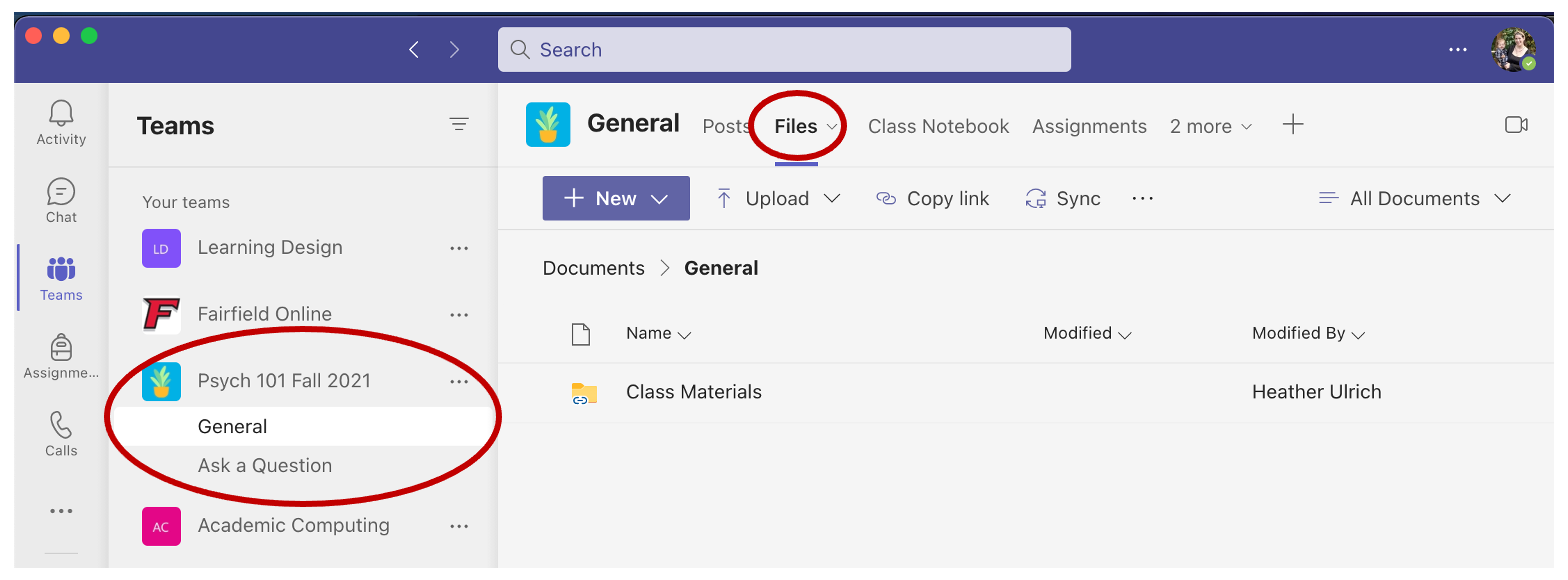
- On the left-hand menu, click on Teams
- Click on the team (or class) you want to visit.
- At the top of the page, click on Files
You will then see any files that have been uploaded by anyone on your “team”
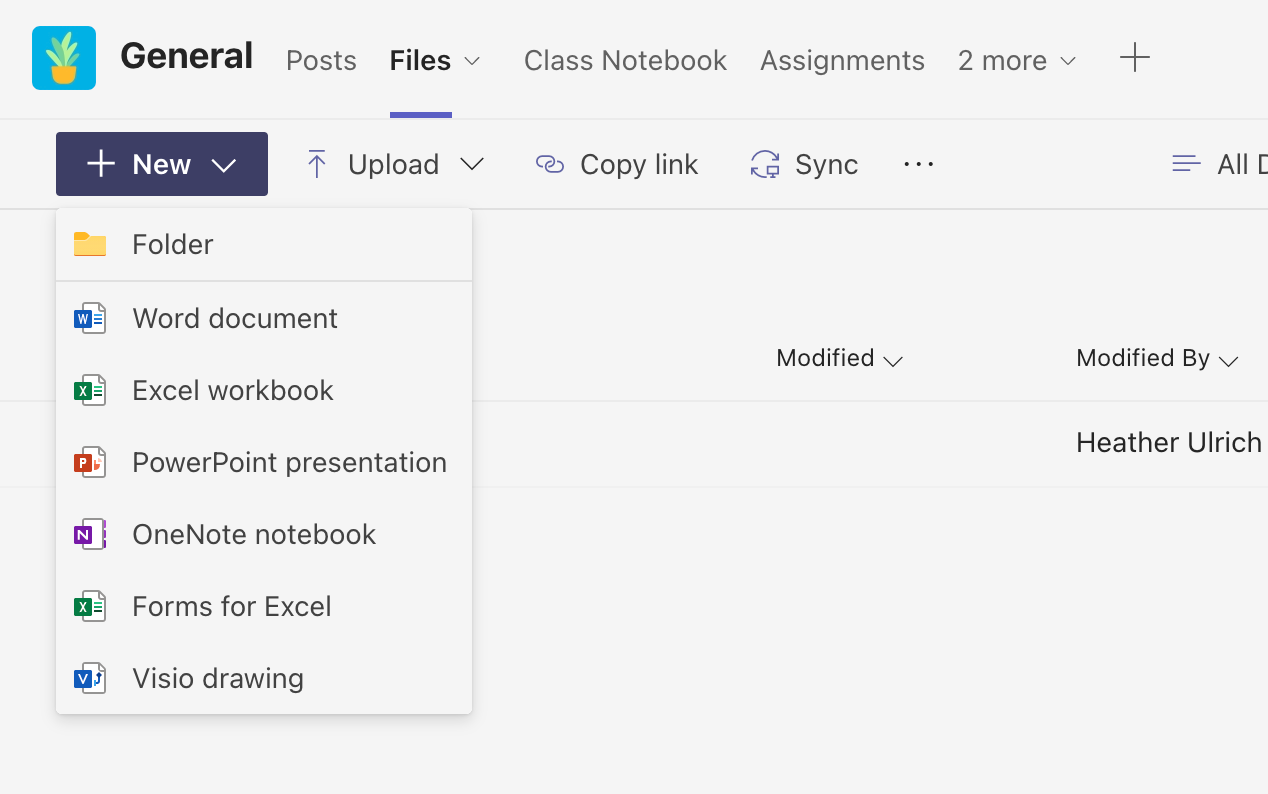
If you want to create a new document within Teams, click on New and choose which type of document you would like to start building out in Teams.
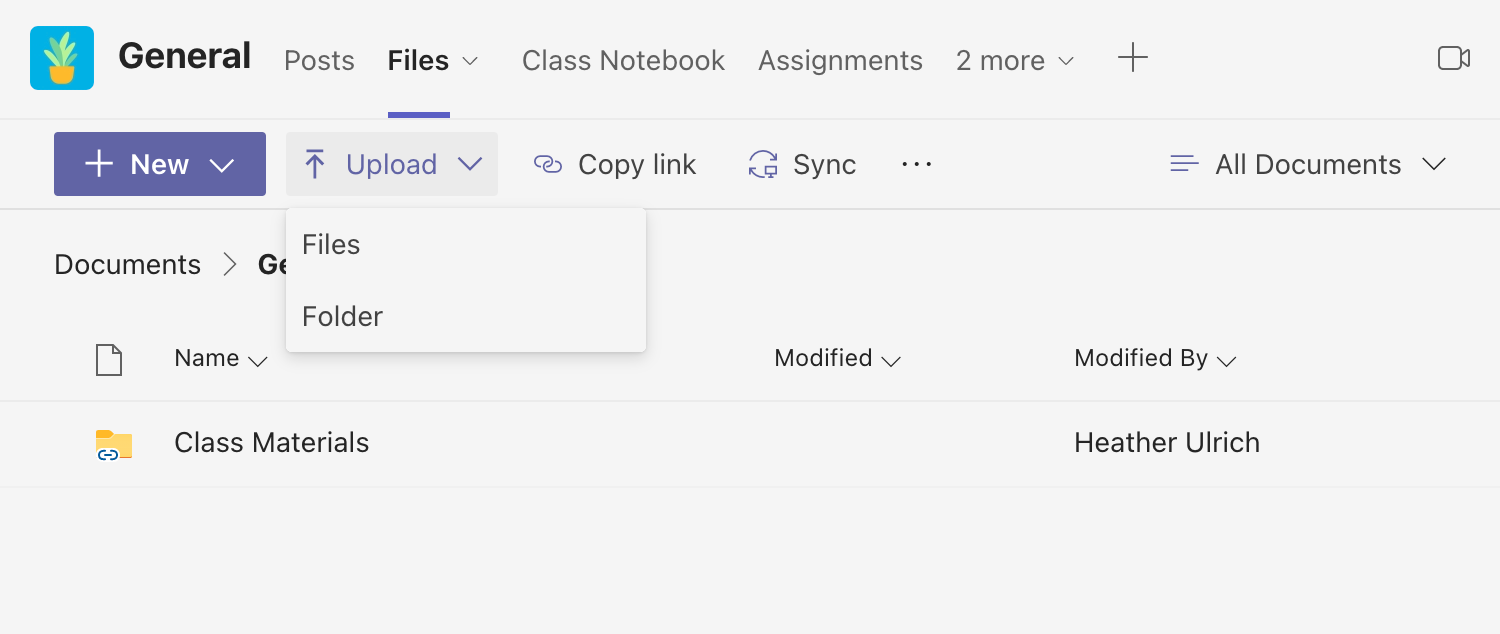
If you would like to upload a file from your computer, click on Upload and then choose whether you want to upload a file or folder from your computer.
Frequently Asked Questions
Can I download Microsoft Teams on my mobile device?
Yes! You can search for Microsoft Teams in your mobile device's App Store, or you can enter your phone number to receive a text to download the app from Microsoft.
Are my files and conversations secure in Microsoft Teams?
Yes. Data is encrypted in transit and at rest.
Related articles
Related content
Contact the ITS Help Desk in the Library Room 230 or at (203) 254-4069 for assistance.
